 Save to Pinterest
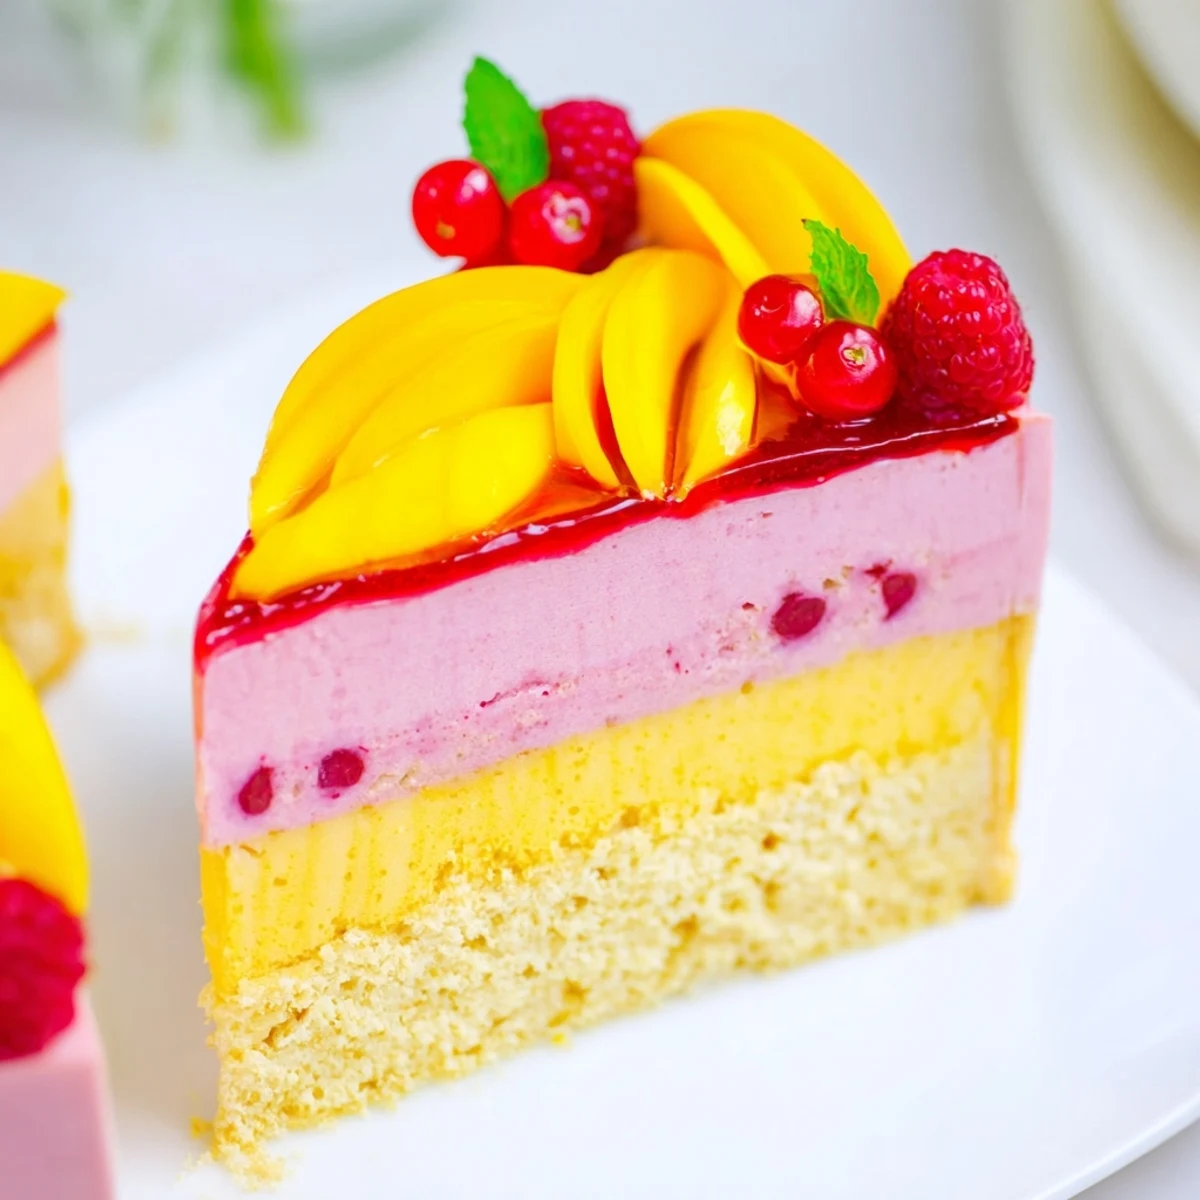
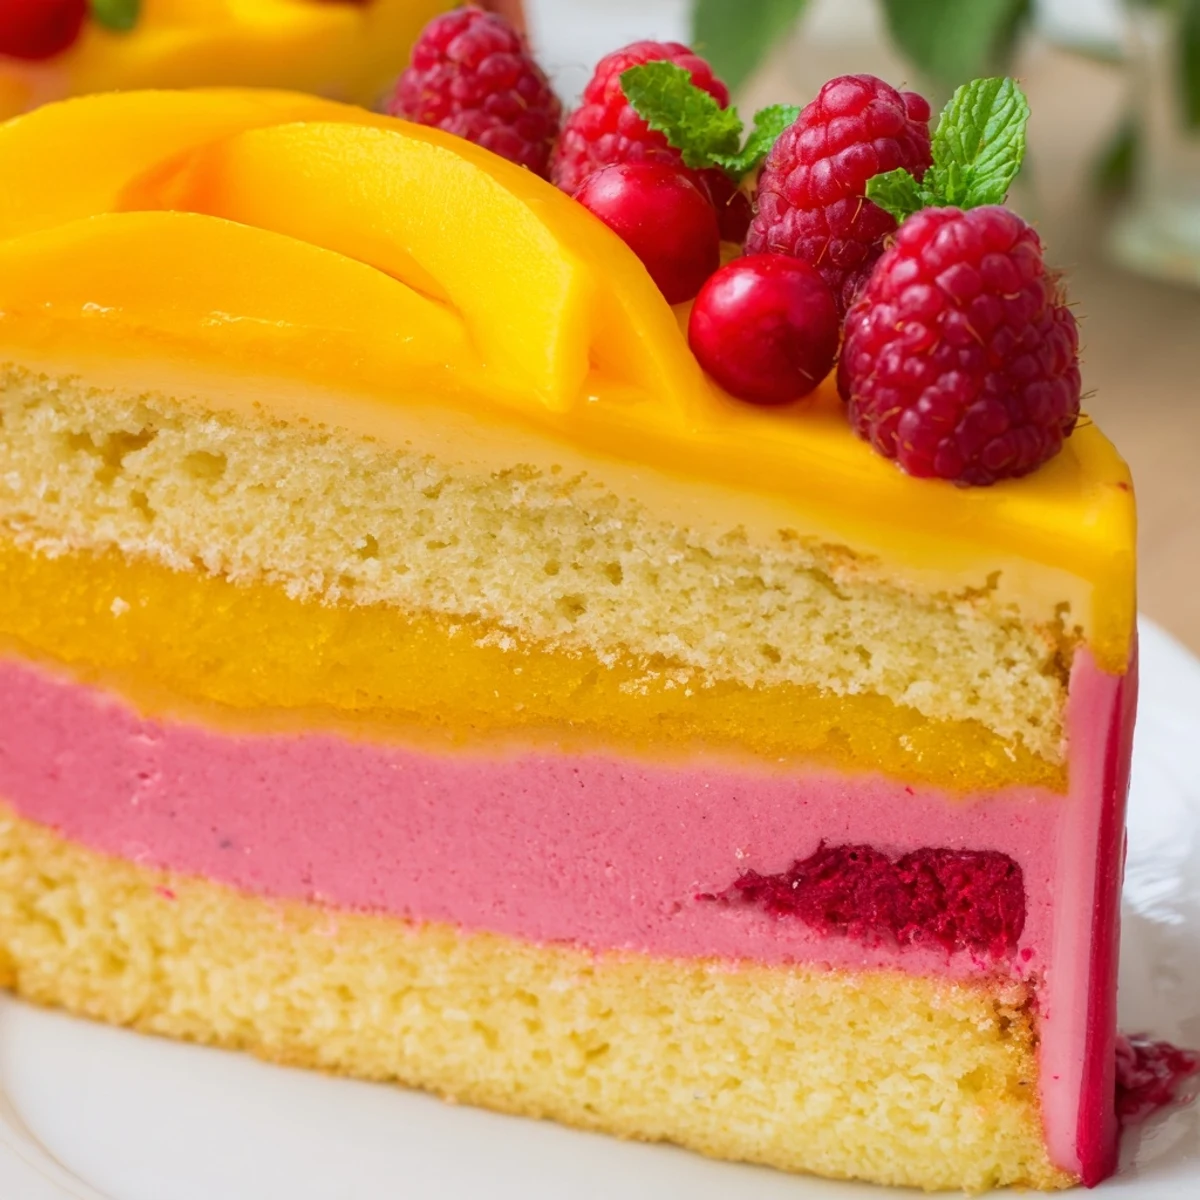
 This stunning dessert features airy layers of tropical mango and vibrant raspberry mousse resting on a tender vanilla sponge base. The mango mousse brings creamy sweetness with a hint of lime, while the raspberry layer adds tart brightness and beautiful pink color. Fresh fruit crowns the creation, making it as gorgeous as it is delicious.
Though it looks impressive, this mousse cake comes together with straightforward techniques. The sponge bakes quickly, and both mousses use the same method: pureeing fruit, dissolving gelatin, and folding in whipped cream. Each layer sets in the refrigerator before adding the next, building structure without complicated assembly.
The result is a light, refreshing dessert that tastes indulgent yet feels airy on the palate. It's ideal for summer entertaining, special occasions, or whenever you want a fruit-forward finale that balances sweetness with bright acidity.
The afternoon I first attempted this mousse cake, my tiny apartment kitchen smelled like tropical sunshine mixed with tart berries. I had invited friends over for a summer dinner party and wanted something impressive yet refreshing. When I unveiled that first slice with its sunset gradient of golden mango and bright raspberry layers, the table went completely quiet before everyone reached for their forks at once.
Last summer, my neighbor caught me hovering by the refrigerator at midnight, checking if the layers had set properly. She laughed and asked what was so important that required inspection at 2 AM intervals. When I brought her a slice the next morning, she understood completely and demanded the recipe before she finished her coffee.
Ingredients
- 3 large eggs: Room temperature eggs whip up fluffier and incorporate more air into your sponge
- 90 g (¾ cup) granulated sugar: Fine sugar dissolves more easily into the egg mixture
- 90 g (¾ cup) all-purpose flour: Sifted twice prevents lumps and keeps the sponge tender
- 1 tsp vanilla extract: Pure vanilla makes a noticeable difference in flavor depth
- Pinch of salt: Enhances sweetness without adding saltiness
- 300 g (2 cups) ripe mango flesh: Choose mangoes that yield slightly to gentle pressure for natural sweetness
- 50 g (¼ cup) granulated sugar: Adjust based on mango ripeness
- 2 tbsp fresh lime juice: Brightens the mango flavor and prevents browning
- 250 ml (1 cup) heavy whipping cream: Must be thoroughly chilled for proper whipping
- 6 g (2 tsp) powdered gelatin: Essential for the mousse structure
- 3 tbsp cold water: For blooming the gelatin properly
- 200 g (1 ½ cups) fresh or frozen raspberries: Frozen work well but may need slightly more sugar
- 50 g (¼ cup) granulated sugar: Balance to taste depending on berry tartness
- 1 tbsp fresh lemon juice: Highlights the raspberry brightness
- 200 ml (¾ cup + 2 tbsp) heavy whipping cream: Same chilling rules apply
- 5 g (1 ½ tsp) powdered gelatin: Slightly less than mango layer since raspberry holds differently
- 2 tbsp cold water: Keep temperature consistent when blooming
- Fresh mango slices: Cut thin for elegant topping placement
- Fresh raspberries: Select plump, deeply colored berries
- Mint leaves: Adds a pop of color and freshness
Instructions
- Prepare the foundation:
- Preheat oven to 180°C (350°F) and line a 23 cm springform pan with parchment paper. Grease the sides lightly with butter or cooking spray.
- Create the sponge base:
- Beat eggs and sugar until pale and fluffy, about 5 minutes. The mixture should ribbon when you lift the beaters. Fold in vanilla, salt, and flour gently until just combined.
- Bake to golden perfection:
- Pour batter into prepared pan and bake 12-15 minutes until golden and springy to touch. Cool completely in the pan on a wire rack.
- Bloom the mango gelatin:
- Sprinkle gelatin over cold water and let soften for 5 minutes. Meanwhile, puree mango with sugar and lime until completely smooth.
- Combine mango mixture:
- Gently heat mango puree in a small saucepan until warm but not boiling. Remove from heat and stir in bloomed gelatin until fully dissolved. Cool to room temperature.
- Whip cream for mango layer:
- Whip cold cream to medium peaks, where cream holds its shape but still has movement. Fold gently into cooled mango mixture until no white streaks remain.
- Add first mousse layer:
- Spread mango mousse evenly over cooled sponge base using an offset spatula. Refrigerate 30 minutes until set to touch.
- Prepare raspberry layer:
- Bloom gelatin in cold water for 5 minutes. Puree raspberries with sugar and lemon, then strain through fine mesh sieve to remove seeds completely.
- Complete raspberry mousse:
- Warm raspberry puree slightly, stir in dissolved gelatin, and cool to room temperature. Whip cream to medium peaks and fold into raspberry mixture gently but thoroughly.
- Layer raspberry mousse:
- Carefully spread raspberry mousse over set mango layer, working gently to avoid disturbing bottom layer. Refrigerate at least 3 hours or preferably overnight.
- Finish with decoration:
- Release springform ring carefully. Top with fresh mango slices arranged in a pattern, raspberries scattered naturally, and mint leaves for freshness.
 Save to Pinterest
 This cake has become my go to for summer birthdays because it feels festive without weighing everyone down. Last month, my niece declared it the most beautiful thing she had ever seen on a plate, then proceeded to eat three slices.
Making Ahead
You can prepare the sponge base one day ahead and store it wrapped tightly at room temperature. The assembled cake actually improves after chilling overnight, allowing flavors to meld and layers to firm up beautifully. Keep it covered in the refrigerator until serving time.
Choosing Your Fruit
Select mangoes that give slightly when pressed and have a sweet fragrance near the stem. For raspberries, avoid containers with juice at the bottom which indicates overripe or crushed berries. If mangoes are out of season, frozen puree works surprisingly well.
Serving Suggestions
Let the cake sit at room temperature for 10 minutes before slicing for the best texture. Use a sharp knife dipped in hot water and wiped clean between cuts for pristine layers.
- Chill your serving plates beforehand for restaurant style presentation
- Offer lightly sweetened whipped cream on the side for guests who want extra richness
- Pour glasses of Moscato dAsti or prosecco to complement the fruity flavors
 Save to Pinterest
 There is something deeply satisfying about slicing through those vibrant layers and watching the surprise on your guests faces when they taste that first light, fruity bite.
Recipe FAQs
- → Can I make this dessert ahead of time?
-
Absolutely. This mousse cake actually improves when made 1-2 days ahead, allowing flavors to meld and textures to set completely. Keep refrigerated and add fresh decorations just before serving for the best presentation.
- → What if I can't find fresh mangoes?
-
Use frozen mango chunks (thawed and drained) or good-quality mango puree from a specialty store. The texture will remain consistent, though fresh mango offers the brightest flavor. Avoid canned mango in heavy syrup as it alters the sweetness balance.
- → How do I know when the mousse layers are properly set?
-
Each layer should feel firm to the touch, not jiggly or liquid. The mango layer needs about 30 minutes in the refrigerator before adding the raspberry layer. The entire cake requires at least 3 hours to fully set, but overnight chilling yields clean slices and the best texture.
- → Can I substitute the gelatin?
-
For a vegetarian version, use agar-agar powder following package instructions for gelling liquids. Note that agar sets more firmly than gelatin, so you may prefer using slightly less. The texture will be slightly different but still delicious.
- → What's the best way to slice this cake cleanly?
-
Use a sharp knife dipped in hot water and wiped dry between cuts. Run the knife under hot water, dry thoroughly, then slice in one smooth motion. The heat helps the blade glide through the mousse without dragging or sticking.
- → Can I use frozen raspberries for the mousse?
-
Yes, frozen raspberries work beautifully. Thaw them completely and drain any excess liquid before pureeing. Strain the puree thoroughly to remove seeds—frozen berries sometimes break down more than fresh, making straining especially important for a smooth texture.
